Garage Door Rough Opening: 1 Best Way
Garage Door Rough Opening: Key Tips to Avoid Errors
Creating the perfect garage door rough opening is the foundation of any successful garage build. Whether you are building a new home or renovating an older structure, getting the framing right is critical. Many homeowners underestimate the precision required for this task. A small error in measurement can lead to significant headaches later. If the opening is too small, the door simply will not fit. If it is too large, you risk air leaks, security issues, and structural instability. Understanding the nuances of a garage door rough opening ensures that your project proceeds smoothly from start to finish. This guide dives deep into every aspect you need to know, from basic definitions to complex installation techniques.
When you plan a garage door rough opening, you are setting the stage for the largest moving part of your home. It is not just about aesthetics; it is about functionality and safety. A well-framed opening supports the heavy tracks and springs that operate the door. Without solid lumber and correct spacing, the system may fail prematurely. This article explores how to calculate the correct dimensions and why accuracy matters so much. We will also discuss the financial aspects, helping you budget for materials and labor. By the end of this comprehensive guide, you will have the confidence to tackle your garage project with professional precision.
What Is a Garage Door Rough Opening?
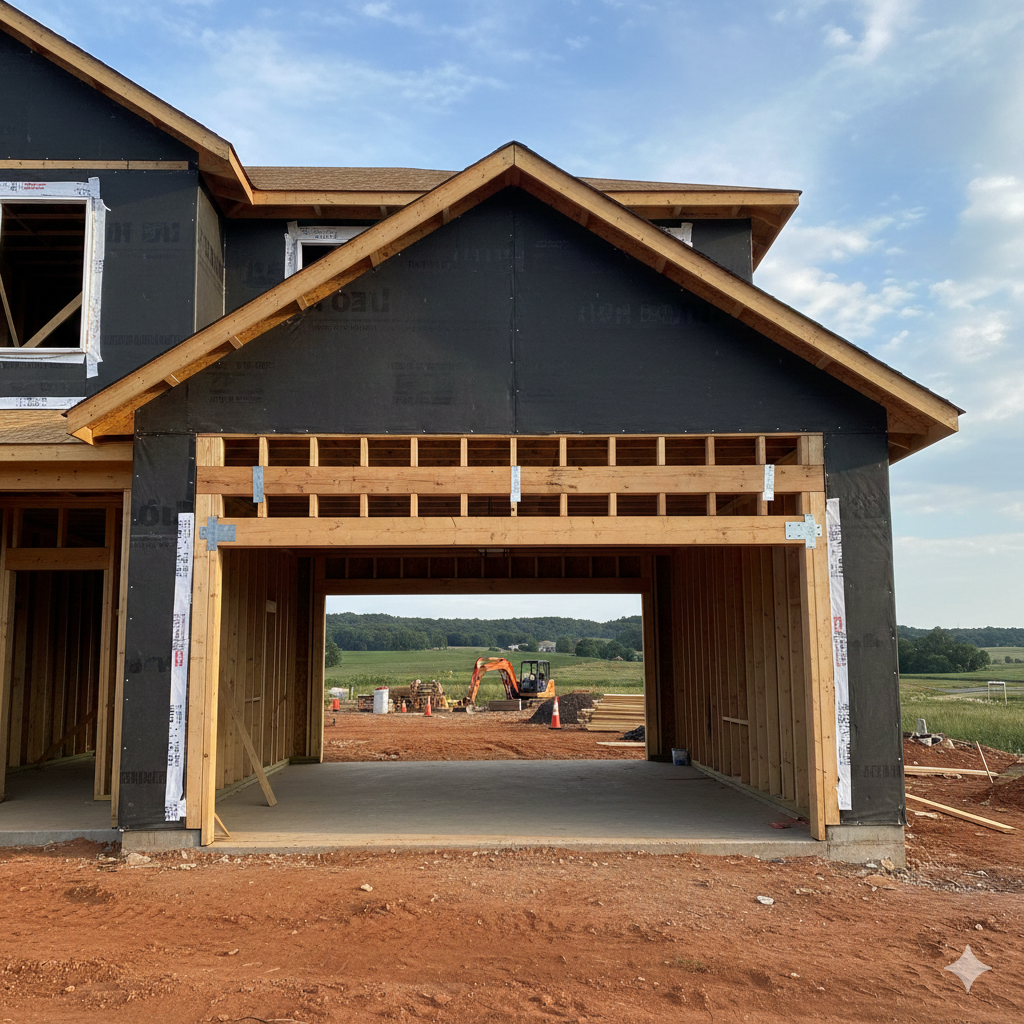
A garage door rough opening is the framed structural opening in a wall where the garage door will eventually be installed. It is essentially the raw hole left in the framing before any finish work, such as jambs or trim, is applied. This opening is framed by wood studs, a header at the top, and the floor plate at the bottom. The size of this opening must be slightly larger than the actual door size to accommodate the door jambs. For example, if you buy a standard 16×7 door, the garage door rough opening will be framed to specific dimensions that match the manufacturer’s requirements.
Understanding what constitutes a garage door rough opening is vital for builders and DIY enthusiasts alike. It is distinct from the “finished opening,” which is the measurement after the stop molding and jambs are installed. The rough opening is the skeleton. It must be square, plumb, and level. If the framing is twisted or uneven, the door tracks will not align correctly. This can cause the door to bind, make noise, or even derail. Therefore, the garage door rough opening is the critical first step in the installation process that dictates the quality of the final result.

How to Find the Right Rough Opening Size
Finding the correct size for your garage door rough opening typically starts with the door you intend to purchase. Most manufacturers provide detailed specifications sheets. As a general rule of thumb, the width of the rough opening should be the same as the door width, while the height usually requires a specific clearance. However, this can vary based on the type of jamb material you plan to use. If you use thicker lumber for the jambs, you might need a slightly wider garage door rough opening. Always consult the technical data provided by the door supplier before cutting any wood.
Another method to find the right dimensions for a garage door rough opening is to measure the existing space if you are replacing a door. However, never assume the old opening is correct for a new door. Standards change, and older homes may have settled. It is safer to strip the opening back to the studs to see the true garage door rough opening. This allows you to inspect the condition of the header and jack studs. Accurate measurement is non-negotiable. Using a digital laser measure or a high-quality tape measure ensures that your garage door rough opening is precise down to the fraction of an inch.
How to Buy Materials for the Opening
When you prepare to buy materials for a garage door rough opening, quality lumber is essential. You need straight, pressure-treated wood for the bottom plates and standard framing lumber for the studs and headers. The header is particularly important because it carries the weight of the roof or floor above the opening. Depending on the span of the garage door rough opening, you may need engineered lumber or multiple 2x12s sandwiched with plywood. Visiting a local lumberyard often yields better quality wood than big-box stores, ensuring your framing remains stable over time.
buying the right hardware is also part of the process for a garage door rough opening. You will need structural screws or nails that meet local building codes. Some regions require hurricane ties or specific metal brackets to secure the header to the posts. When you purchase materials, always factor in a little extra for waste. Having spare lumber allows you to correct mistakes without halting the project. Remember, the strength of your garage door rough opening relies heavily on the quality of the materials you buy. investing in premium grade studs ensures that your walls remain straight and true.
How Much Does It Cost to Frame?
The cost to frame a garage door rough opening varies based on size, location, and material prices. For a standard single-car garage, the lumber and hardware might cost a few hundred dollars. However, if you are hiring a professional, labor costs will increase the total significantly. A carpenter might charge an hourly rate or a flat fee for the project. Framing a garage door rough opening is usually part of a larger construction bid, but for a remodel, it can be a standalone expense. Complex headers for double-wide doors are more expensive due to the need for larger, engineered beams.
Budgeting for a garage door rough opening should also include potential structural repairs. If you open a wall and find rot or termite damage, the cost will rise. Additionally, finishing the exterior around the garage door rough opening adds to the price. You need weather stripping, flashing, and trim to seal the gap between the siding and the door frame. While the rough framing itself is relatively inexpensive compared to the door, cutting corners here can lead to costly repairs later. A solid garage door rough opening is an investment in the longevity of your garage door system.
Why Is Accurate Framing Crucial?
Accuracy is crucial because the garage door rough opening dictates how well the door seals and operates. A door installed in a crooked opening will have gaps that let in drafts, pests, and moisture. Over time, these gaps can lead to water damage and higher energy bills. Furthermore, if the garage door rough opening is not square, the tracks will be under stress. This causes premature wear on the rollers and springs. The safety mechanism, specifically the photo-eye sensors, also relies on proper alignment which starts with the framing.
Safety is another reason why the garage door rough opening must be perfect. A garage door is a heavy object suspended over your car and family. If the header is undersized or the jack studs are not properly supported, the structure could sag or collapse. In areas with high winds or seismic activity, a robust garage door rough opening is essential for structural integrity. Building codes are strict about header sizes and fastening patterns for this very reason. Therefore, ensuring your garage door rough opening meets all engineering standards is vital for the safety of your home.
How Long Does Framing Take?
Framing a garage door rough opening is generally a quick process for an experienced carpenter. For a standard size, the actual framing might take only a few hours. This includes measuring, cutting the lumber, building the header, and securing the studs. However, if you are modifying an existing load-bearing wall to create a new garage door rough opening, the process takes longer. You must first install temporary support walls to hold up the ceiling before removing the old studs. This preparatory work can add a full day to the timeline.
For a DIYer, creating a garage door rough opening might take a weekend. You need time to double-check measurements and ensure everything is level. Rushing through the construction of a garage door rough opening often leads to mistakes that take twice as long to fix. Factors like removing exterior siding, rerouting electrical wires, or moving plumbing pipes can also extend the duration. Generally, you should plan for at least one to two days to complete a garage door rough opening properly, ensuring you have ample time to address any unforeseen structural challenges.

How to Install the Header and Studs
Installing the header is the most physically demanding part of creating a garage door rough opening. The header must rest securely on the jack studs (also called trimmer studs), which transfer the load down to the foundation. First, you install the king studs, which run from the bottom plate to the top plate. Then, you nail the jack studs to the king studs. The header is lifted into place and sits on top of these jacks. This creates the top of your garage door rough opening. It is critical that the header fits tightly and is level across the entire span.
Once the header is in place, you add cripple studs above it to bridge the gap to the top plate. This completes the structural frame of the garage door rough opening. Every connection should be nailed according to code. When installing these components, constantly check for plumb. If the king studs bow outward or inward, the garage door rough opening will not be square. Using a framing square and a long level helps maintain accuracy. A solid installation ensures that the garage door rough opening can withstand the dynamic loads of the opening and closing door for years to come.
What Is the Cost of Mistakes?
The cost of mistakes when framing a garage door rough opening can be staggering. If the opening is framed too narrow, you may have to rip out the jack studs and the header to widen it. This involves significant labor and wasted materials. Conversely, if the garage door rough opening is too wide, you will have to pad it out with extra lumber, which can compromise the structural integrity and look clumsy. In severe cases, an incorrect opening requires ordering a custom-sized door, which is much more expensive than a standard stock door.
Beyond the immediate financial loss, a poorly framed garage door rough opening leads to long-term operational costs. Misaligned tracks cause rapid wear on the opener motor and door hardware. You might find yourself replacing springs and rollers frequently. Air leakage due to gaps around the garage door rough opening increases heating and cooling costs for the attached home. Fixing these issues often requires removing the entire door and rebuilding the frame. Therefore, investing time and care into getting the garage door rough opening right the first time saves substantial money and frustration.
Advantages and Challenges of DIY Framing
One of the main advantages of framing your own garage door rough opening is cost savings. You eliminate the labor markup, paying only for materials. It also gives you complete control over the quality of the lumber and the precision of the work. For those who enjoy carpentry, building a garage door rough opening provides a sense of accomplishment. You can ensure that extra insulation is added or that the header is over-engineered for added strength. Additionally, you can work on your own schedule, pausing to ensure every measurement of the garage door rough opening is exact.
However, the challenges are significant. Framing a garage door rough opening involves handling heavy lumber and using dangerous power tools. Structural modifications to load-bearing walls carry risks; improper support can cause sagging ceilings or roof collapse. If you are not familiar with local building codes, your garage door rough opening might fail inspection, requiring you to redo the work. Furthermore, the physical demand of lifting headers can be taxing. Weighing these challenges against the savings is important before deciding to tackle a garage door rough opening project yourself.
Special Technical Details: Framing, Charts, and Dimensions
When you dive into the technical side, precision is key. This section covers four specific topics: how to frame a garage door rough opening, using a garage door rough opening chart, understanding garage door rough opening dimensions, and the concept of rough opening for garage door.
To understand how to frame a garage door rough opening, you must visualize the load path. The weight travels from the roof, to the header, down the jack studs, and into the foundation. The header size is determined by the width of the opening. Wider openings require taller and thicker headers. Using a garage door rough opening chart is the best way to determine these requirements. These charts correlate door sizes with necessary header spans and rough opening widths. For instance, a chart will tell you that a 16-foot door needs a header composed of two 2x12s or an engineered beam.
Next, consider garage door rough opening dimensions. The standard rule is that the rough opening should be the exact width of the door. If you have a 9×7 door, the rough opening width is 9 feet. The height, however, is often framed to the door height minus a specific amount for the header drop, or exactly the door height if the headroom allows. Verifying these garage door rough opening dimensions against the manufacturer’s instructions is critical. Finally, when discussing the rough opening for garage door, remember that the side clearance (sideroom) is just as important as the opening itself. You need space on the inside walls for the vertical tracks to mount.
FAQ : Garage door rough opening
What happens if my garage door rough opening is not square?
If the opening is not square, the door tracks will not be parallel. This causes the door to bind, jam, or operate noisily. It may also lead to gaps that compromise insulation and security.
Do I need a permit to change a garage door rough opening?
Yes, in most jurisdictions, altering a structural wall to create or resize an opening requires a building permit. Always check with your local building department before starting work.
Can I use pressure-treated lumber for the garage door rough opening?
It is recommended to use pressure-treated lumber for the bottom plate where it contacts concrete. However, standard framing lumber is typically used for the studs and headers to prevent warping affecting the door fit.
How much wider should the garage door rough opening be than the door?
Typically, the rough opening width is the same as the door width. The finished opening is created by adding stop molding, which overlaps the door slightly to create a seal.
Is the header always necessary for a garage door rough opening?
Yes, a header is absolutely necessary. It supports the weight of the structure above the opening. Without a proper header, the wall could collapse or sag, preventing the door from opening.

Conclusion
In summary, the garage door rough opening is a fundamental component of your garage’s structure. It demands careful planning, precise measurement, and robust construction. From understanding the basic definition to navigating the complexities of headers and load paths, every step matters. Whether you choose to hire a professional or do it yourself, knowing the details of a garage door rough opening empowers you to make better decisions. We have explored the costs, the risks of errors, and the essential installation techniques.
Remember that a well-executed garage door rough opening ensures your garage door operates smoothly, safely, and efficiently. It protects your home from the elements and enhances security. By following the guidelines and utilizing resources like sizing charts, you can achieve a professional result. Don’t rush this stage; the quality of your garage door rough opening sets the standard for the rest of your project. With the right materials and attention to detail, your new garage entry will stand the test of time.
🔧 Other Resources
• Precision Door – How to Frame Garage Door – Instructional page explaining how to frame a garage door opening.
• Reddit HomeImprovement Community – Community discussion offering advice on framing and rough opening for garage doors.
• YouTube Video – Video demonstrating garage door framing and rough opening techniques.
🔎 Other Helpful Articles
• Garage Door Repair Fort Myers – Informational article explaining garage door repair services in Fort Myers.
• Emergency Garage Door Repair – Educational guide outlining common emergency garage door repair situations.
• LiftMaster Garage Door Repair – Informational article describing LiftMaster garage door opener repair topics.