Garage Door Sensor: 1 Easy Ways to Fix It
Garage Door Sensor: Critical Safety Tips
A functional garage door sensor is not just a convenience; it is a critical safety component of your modern home ecosystem. Since 1993, federal laws have mandated that every residential garage door opener sold in the United States must include a safety reversing mechanism. The garage door sensor is the primary device that fulfills this requirement, using invisible infrared beams to detect obstructions and prevent the heavy door from closing on vehicles, pets, or people. Understanding exactly how this device works, how to maintain it, and how to troubleshoot it when things go wrong is essential for every homeowner.
Whether you are dealing with a blinking light, a door that refuses to close, or simply want to upgrade your current system, this guide covers every aspect of the garage door sensor. We will explore what it is, how to install it, how to find the right replacement, and the specific costs involved. By the end of this article, you will be an expert on your home’s garage door sensor system, ensuring it operates smoothly for years to come.
What Is a Garage Door Sensor and How Does It Work?
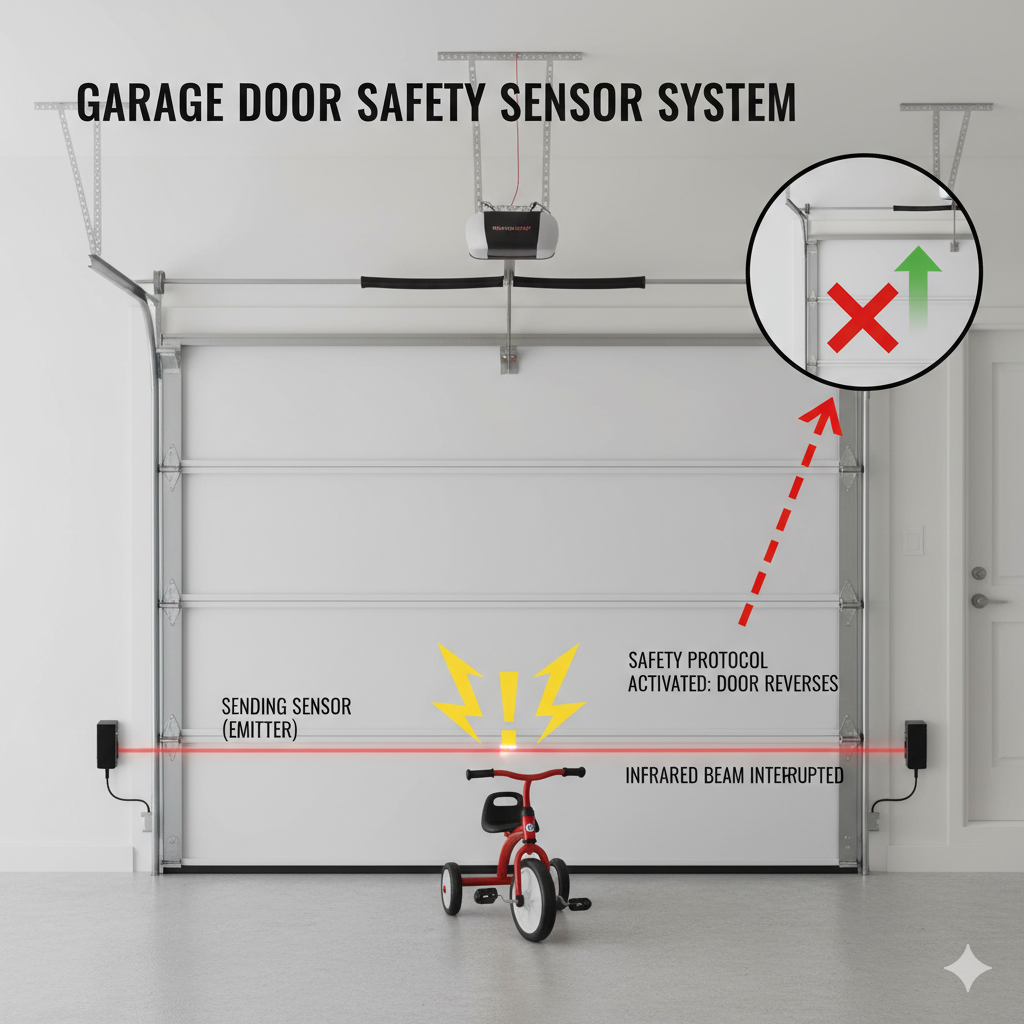
A garage door sensor, often referred to as a “photo-eye” or “safety sensor,” is an electronic device designed to signal the garage door opener to stop and reverse if an object is in the door’s path. These sensors typically come in pairs. One unit, known as the sending sensor or emitter, transmits an invisible beam of infrared light across the width of the garage door opening. The second unit, known as the receiving sensor, sits on the opposite side and detects this light.
When the garage door is in the process of closing, the opener constantly monitors the signal from the receiving garage door sensor. If the infrared beam is uninterrupted, the logic board assumes the path is clear and allows the door to close fully. However, if a person, pet, or object breaks the beam, the receiving garage door sensor fails to detect the signal. This interruption triggers the safety protocol, causing the opener to stop the motor immediately and reverse the door to the fully open position. This split-second reaction is what prevents injuries and property damage.
Most modern garage door sensor systems use LED lights to indicate their status. A solid glowing light usually means the sensors are powered and aligned correctly. A blinking light often indicates a misalignment, a blockage, or a wiring issue. Understanding these visual cues is the first step in diagnosing any problem with your garage door sensor. While the technology is relatively simple, relying on basic optics and low-voltage wiring, its impact on home safety is profound. Without a functioning garage door sensor, your automatic door becomes a potential hazard rather than a convenience.

How to Find the Right Compatible Sensor for Your Opener
Finding the correct replacement garage door sensor requires identifying the brand, model, and age of your garage door opener. While many sensors look similar, they are not always interchangeable across different manufacturers. For instance, a LiftMaster garage door sensor uses specific communication protocols that may not be compatible with a Genie or Craftsman opener, even if the physical wiring looks identical.
To start, locate the motor unit mounted on your garage ceiling. Look for the manufacturer’s label, which will list the brand name (such as Chamberlain, LiftMaster, Genie, or Sears Craftsman) and the specific model number. Once you have this information, you can search for a compatible garage door sensor kit. Many manufacturers use color-coded learn buttons or antenna wires to denote compatibility eras, which can also help you select the right garage door sensor.
If you have an older opener manufactured before 1993, it may not have the terminals or logic board software to support a modern garage door sensor. In this case, you cannot simply add a sensor; you must replace the entire opener unit to comply with current safety standards. For openers made after 1993, compatibility is usually straightforward. However, it is always safer to stick with OEM (Original Equipment Manufacturer) parts. Using a garage door sensor designed specifically for your machine ensures that the safety reversal system functions exactly as the engineers intended, providing you with maximum peace of mind.
How to Buy: Choosing Between OEM and Universal Models
When you are ready to purchase a new garage door sensor, you will generally face two options: OEM sensors or universal sensors. OEM sensors are made by the same company that built your opener. For example, if you buy a Chamberlain garage door sensor for a Chamberlain opener, you are guaranteed perfect compatibility. The connectors, mounting brackets, and wiring diagrams will match your existing setup perfectly, making installation much easier for the average DIYer.
On the other hand, universal garage door sensor kits are designed to work with multiple brands. These can be a convenient option if you cannot find the specific part for an older model or if you need a quick replacement available at a local hardware store. Universal sensors often come with various adapters and brackets to fit different track styles. However, “universal” does not always mean “plug-and-play.” You may need to splice wires or adjust mounting positions more aggressively to get a universal garage door sensor to align correctly with your specific door tracks.
You can buy a garage door sensor at major home improvement retailers like Home Depot, Lowe’s, or Menards. Online marketplaces like Amazon and specialized garage door supply websites also offer a vast selection. When buying, always check the customer reviews and the “compatible models” list in the product description. A highly-rated garage door sensor with a robust warranty is worth the extra few dollars compared to a cheap, generic knock-off that might fail after a few months of exposure to cold or humidity.
How Much Does It Cost to Replace or Install Sensors?
The cost to replace a garage door sensor varies depending on whether you choose to do the work yourself or hire a professional. If you are comfortable with basic tools and wiring, a DIY replacement is very affordable. A standard pair of OEM garage door sensor units typically costs between $30 and $50. Universal kits can be found for as low as $25, while premium smart-home integrated sensors might run up to $80 or more. Since you are providing the labor, your only other expense might be a few wire nuts or electrical tape.
However, if you prefer to hire a professional technician, the price will be significantly higher. A professional service call usually includes a trip charge and a minimum labor fee. You can expect to pay anywhere from $80 to $150 for the labor alone, plus the cost of the garage door sensor parts, which the company may mark up. Therefore, the total cost for professional replacement often ranges from $150 to $250.
While the professional route is more expensive, it comes with the assurance that the garage door sensor is aligned perfectly and the wiring is secure. Professionals can also inspect the rest of your door system while they are there. If you are on a tight budget, replacing the garage door sensor yourself is one of the most cost-effective home repairs you can perform. The relatively low price of the parts makes it a low-risk project for most homeowners.
Garage Door Opener Sensors: Understanding the Technology
When discussing garage door opener sensors, it is helpful to understand the specific variations in technology available on the market. The vast majority of residential systems use Through-Beam Sensors. As described earlier, this system relies on a separate emitter and receiver. This technology is highly reliable because the beam is strong and focused. However, it requires running wires down both sides of the garage door frame, which can be visually cluttered if not managed well.
Another type found in some commercial or specific residential applications is the Retro-Reflective Sensor. In this setup, the garage door sensor contains both the emitter and the receiver in a single unit. It shoots the beam across the opening to a reflector mounted on the opposite side, which bounces the signal back. This simplifies wiring since you only need to power one side. However, retro-reflective garage door sensor systems can be more sensitive to dirt, fog, or misalignment, as the beam must travel twice the distance (there and back) and relies on a passive reflector.
Regardless of the type, all garage door opener sensors operate on low voltage (usually 24 volts). They are designed to be fail-safe. This means that if the power is cut to the sensor, or if a wire breaks, the opener interprets this as an obstruction. It defaults to the “safe” state, which prevents the door from closing. This “fail-safe” design is a crucial feature of every garage door sensor, ensuring that a mechanical failure never results in an unsafe situation where the door closes blindly.
How to Install Garage Door Sensors: A Step-by-Step Guide
Installing a new garage door sensor is a manageable project that usually takes less than an hour. Before you begin, unplug the garage door opener from the ceiling outlet to prevent electric shock or accidental activation.
Remove the Old Sensors: Start by disconnecting the existing wires from the old garage door sensor. Unscrew the wing nuts or bolts holding the sensor brackets to the track and remove the old units.
Mount the New Brackets: Attach the new brackets to the vertical tracks. The garage door sensor must be mounted no higher than 6 inches above the floor. This height is federally mandated to ensure the sensor detects small children or pets crawling under the door.
Position the Sensors: Secure the sending (amber light) and receiving (green light) garage door sensor units to the brackets. Make sure the lenses are pointing directly at each other across the garage opening.
Route the Wires: Run the low-voltage wires from each garage door sensor up the wall and across the ceiling to the opener motor unit. Use insulated staples to secure the wire, being careful not to pierce the insulation.
Connect to the Opener: Strip about 7/16 inch of insulation from the ends of the wires. Twist the white wires together and the white-with-black-stripe wires together. Insert them into the corresponding terminals on the motor unit (usually labeled white/common and black/sensor).
Power Up and Test: Plug the opener back in. Check the lights on each garage door sensor. If they are glowing steadily, the installation is correct. If they are blinking, you will need to adjust the alignment.
Proper installation is vital. A loosely mounted garage door sensor can vibrate out of alignment, causing nuisance reversals later.
How to Align Garage Door Sensors Properly
Alignment is the most common issue homeowners face with their garage door sensor system. Even a slight bump from a bicycle or a trash can knock a sensor off its axis. When the sensors are misaligned, the receiving unit cannot “see” the beam from the emitter, and the door will refuse to close.
To align your garage door sensors, follow these steps:
Locate the Indicator Lights: Look at the LEDs on both units. The sending garage door sensor usually has an amber or yellow light that should always be solid if it has power. The receiving sensor usually has a green light. If the green light is off or flickering, the sensors are misaligned.
Loosen the Wing Nut: Slightly loosen the wing nut on the receiving garage door sensor bracket. You want it loose enough to move by hand but tight enough to hold its position.
Adjust the Angle: Gently rotate the receiving garage door sensor up, down, left, or right. Watch the LED closely. You are looking for the exact position where the green light glows steadily and strongly.
Check the Sender: If adjusting the receiver doesn’t work, go to the sending garage door sensor and adjust its aim. Imagine a laser pointer coming out of it; it must point directly at the receiving lens.
Tighten and Verify: Once both LEDs are solid, carefully tighten the wing nuts without moving the sensors. Test the system by closing the door. If it closes without reversing, your garage door sensor alignment is successful.

How to Fix Garage Door Sensor: Diagnosis and Repair
When your garage door sensor malfunctions, it can be frustrating. The most common symptom is that the door opens fine but reverses immediately when you try to close it, often accompanied by the main opener lights flashing and a clicking sound. Here is a comprehensive guide on how to fix these issues.
Check for Obstructions:
The simplest fix is often the most overlooked. Check the path between the two garage door sensor units. A spider web, a fallen leaf, or a stored shovel handle might be breaking the beam. Clear the area completely.
Inspect the Wiring:
Wires can become corroded, chewed by rodents, or disconnected. Trace the wire from each garage door sensor all the way to the motor. Look for staples that might have cut the wire insulation. If you find a break, you can splice the wire back together using a small wire nut or crimp connector.
Clean the Lenses:
Over time, the lens of the garage door sensor can get covered in dust, dirt, or spider silk. Wipe the lenses gently with a soft, dry cloth. Do not use harsh chemicals that could cloud the plastic.
Interpret the Blink Codes:
Most openers have a diagnostic system. For example, on a LiftMaster, the sending garage door sensor might blink a specific number of times to tell you the problem. One flash often means an open circuit (broken wire), while two flashes might mean a short circuit (wires touching). Consult your manual to decode your specific garage door sensor error signals.
Sunlight Interference:
Sometimes, direct sunlight hitting the receiving garage door sensor can blind it. If your door only fails in the late afternoon, this is likely the cause. You can fix this by swapping the sides of the sensors (moving the receiver to the shady side) or by constructing a small “sun shield” out of cardboard or toilet paper tubes to shade the lens.
How to Clean and Maintain Your Sensors for Longevity
Maintenance for a garage door sensor is minimal but necessary. You should inspect your sensors at least twice a year. The garage environment is often dusty and damp, which can degrade electronic components over time.
To clean your garage door sensor, use a microfiber cloth. Dampen it slightly with water if the dirt is stubborn, but avoid soaking the unit. Wipe the lens face in a circular motion. While you are there, wipe down the housing to remove cobwebs.
Check the mounting brackets for rust or looseness. Tighten any screws that may have backed out due to the vibration of the door. Also, inspect the wires entering the back of the garage door sensor. If the casing looks brittle or cracked, wrap it with electrical tape to prevent moisture from corroding the copper inside. A clean and well-maintained garage door sensor is less likely to give you false alarms or fail prematurely.
How Long Do Sensors Last and When to Replace Them
A high-quality garage door sensor is built to be durable, but it is not immortal. On average, you can expect a set of sensors to last between 10 to 15 years. This lifespan aligns roughly with the lifespan of the garage door opener motor itself. However, harsh environmental conditions can shorten this time.
If you live in an area with high humidity, salt air (near the ocean), or extreme temperature fluctuations, the internal electronics of the garage door sensor may degrade faster. Corrosion on the circuit board or the terminals is a common killer of these devices.
You should consider replacing your garage sensor if you experience frequent “phantom” reversals that cannot be fixed by cleaning or alignment. Another sign is if the LED lights become dim or flicker intermittently even when the wiring is secure. Since the garage door sensor is a safety device, it is better to replace it a year too early than a day too late. Given the low cost of replacement, trying to limp along with a failing sensor is rarely worth the hassle or the risk.
Advantages and Challenges Connected to Garage Door Sensor Systems
The primary advantage of the garage sensor is safety. Before these sensors were mandatory, garage doors caused thousands of injuries annually. The garage sensor has virtually eliminated crushing accidents involving automatic doors, making the garage a safer place for children and pets. They also protect your property; if you accidentally leave your car trunk open or a lawnmower in the way, the sensor prevents the heavy door from crushing it.
However, there are challenges. The most significant annoyance is the sensitivity of the system. A garage sensor can be tripped by heavy fog, direct sunlight, or even exhaust fumes in rare cases. This can prevent you from closing your door when you need to leave quickly, leading to frustration. Furthermore, the wiring is vulnerable. Because the wires run along the floor and up the wall, they are susceptible to damage from weed eaters, brooms, or pests. Despite these minor challenges, the safety benefits of a functioning garage sensor far outweigh the occasional maintenance headache.

FAQ
What is the correct height for a garage door sensor?
The federal safety standard requires that every garage door sensor be mounted no more than 6 inches above the garage floor. This height ensures that the beam will detect a small child or pet crawling under the door.
Can I bypass a garage door sensor?
It is technically possible but highly dangerous and illegal to permanently bypass a garage door sensor. Doing so removes the primary safety feature of your door and violates federal UL 325 safety standards.
Why is one garage door sensor light yellow and the other green?
This is normal for many brands like Chamberlain and LiftMaster. The yellow (amber) light indicates the sending garage door sensor, while the green light indicates the receiving sensor.
Do garage door sensors work in the dark?
Yes, a garage door sensor uses infrared light, which is invisible to the human eye and works perfectly in total darkness. Ambient light levels do not affect its ability to detect obstructions.
How do I know if my garage door sensor is bad?
If you have aligned the sensors, checked the wiring, and cleaned the lenses, but the opener still reverses and the lights won’t stay solid, you likely have a faulty garage door sensor that needs replacement.
Can the sun affect my garage door sensor?
Yes, direct sunlight hitting the receiving lens can overwhelm the sensor, blinding it to the infrared beam. This often causes the door to reverse during specific times of the day.
Conclusion
Your home’s garage door sensor is a small but mighty guardian. It operates silently in the background, ensuring that the largest moving object in your house—the garage door—operates safely. By understanding the basics of how a garage door sensor works, how to align it, and how to troubleshoot common issues, you can save yourself time and money on unnecessary service calls. Whether you are installing a brand new system or simply cleaning the lenses of your current one, paying attention to this vital component is a responsibility of every homeowner. Remember, a blinking light is not just an annoyance; it is your garage door sensor telling you that it needs help to keep your family safe.
🔔 Other Resources
Explore these trusted sources to learn more about garage door safety sensors, replacement kits, and compatibility:
Amazon – Garage Door Sensors – Large selection of safety sensors compatible with most garage door openers.
Home Depot – Chamberlain Safety Sensors – Official replacement sensors for Chamberlain and compatible systems.
Overhead Door Parts Online – Safety Sensor Kits – Photocell sensor kits designed for professional and DIY repairs.
🔎 Other Helpful Articles
Garage Door Springs Guide – Learn about spring types, safety, and replacement basics.